
TL;DR This article describes experimental storage setup with ZFS and Bcache as writeback cache on NVMe SSD device.
Before you read the following content, please be aware that the method described below is unsupported! If you look for a tutorial how to setup ZFS correctly, please visit another website. The following post describes the method to get the WRITEBACK cache working with ZFS to improve performance in edge case scenario with relatively huge database. This is not a recommended setup! Just an experiment showing what can possibly be done with ZFS and other components. Encryption with LUKS is not needed, its is added only to glue toegether ZFS and Bcache. ZFS if used here only because of the builtin compression, other advanced features are not used.
In the enterprise world when someone thinks of storage, usually the first two questions to answer are the capacity and performance. Do you need a lot of storage space? Or perhaps you need less capacity but fast IO? And what is “fast”? Bandwidth? Random writes? Reads? etc…
Sometimes however, you actually need the best of both worlds, you may need a lot of really fast storage space.
If your budget is unlimited and you need tons of Terabytes just get a huge HDD array. If you need the fastest storage possible you can get NVMe drives or even some RAM based solutions.
But what if you have a tight budget and still you need to get the fastest possible storage with lots of capacity?
One of the possible solutions is the hybrid storage, basically you can mix fast SSD or NVMe drives with good old HDD rust. Now, one of the ways of doing that is using the ZFS file system that has the builtin “cache” mechanisms called ZIL (for writes) and L2ARC (for reads). However, that “cache” is not really cache. ZIL has a specific use case of being the “backup” for synchronous writes that are cached in RAM first and then dumped to the backing HDD drives periodically and the L2ARC is the L2 cache for the ARC which also is kept in RAM. ZFS algorithm decides what data should and should not be cached. All that means, that despite having the SSD or NVMe drive used as “cache” with ZFS your performance improvement may not be that great afterall and depends on your specific workload.
So, can you do better? In fact, likely you can, by using the writeback cache and compression.
But first, let me give you some explanation on why?
OpenStreetMap PostgreSQL Database
At the beginning of 2023 I decided to work on a project that relies on the OpenStreetMap data. While using OSM for a specific region, like a country or even a continent is relatively doable on average hardware, importing data of the entire planet is a challenge in itself. Compressed planet data in the .pbf format is around 70GB, updated weekly. Import to a PostgreSQL/PostGIS can tak days(!) and the database grows to almost 2TB. Moreover, you need a high performance storage with lots of random IOPS (read/writes per second) to make it usable.
Now, 2TB doesn’t seem like a lot in the enterprise world, you can squeeze that database on a single enterprise NVMe or spread it across an array. But in case you wanted to use older hardware or do it at home you can try the solution described below.
ZFS + Bcache
Bcache is a cache in the Linux kernel’s block layer. Basically you can “hide” a block device like a disk or an array behind Bcache layer which then can make use of a fast device like SSD or NVMe to cache data. It offers multiple modes and one of them is writeback – each and every write operation will be written to the cache first and then to the disk, with that you access hot data much faster (in theory).
Bcache is considered production ready and often used with MDADM raid array as the backing device. On top of that most people would use regular EXT4 or XFS filesystem.
There is one drawback though. Neither EXT4 nor XFS offers compression and when you consider lots of small read and writes across whole 2TB space, compression could (in theory) save a lof of IO and generally improves performance, especially if you can keep as much cached data as possible.
Decent file system that has builtin compression is … ZFS with LZ4 and ZSTD (newer versions).
ZFS + Bcache + LUKS
Now we’re entering murky waters of Linux storage world.
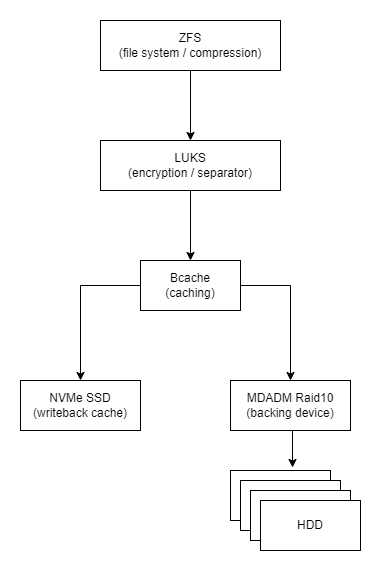
The idea is the following. Let’s use ZFS on Bcache device backed by a pool of HDD drives. It’s doable, but since I’ve already done it, there is a bug(?). Tl;dr. both ZFS and Bcache write their markers to the block devices in apparently simmilar places and the end(?) of partition/device. ZFS will override Bcache magic block and after reboot the setup is gone. To fix that we need another layer and here LUKS (Linux disk encryption) enters the stage. So, the proposed setup is the following:
Warning 1. This setup is highly experimental! Proceed at your own risk.
Warning 2. DON’T use cheap consumer grade NVMe SSD! Their performance will drop drastically when used as writeback cache with lots of random reads and writes.
Test Setup
- Dell T7910, Dual Intel Xeon E5-2673 v4, 128GB RAM runing Debian 11
- /dev/nvme0n1 – NVMe SSD (WD Red SN700 500GB, cheap but good)
- /dev/sdb – Regular 2TB SATA HDD 7200rpm
- /dev/sdc – Regular 2TB SATA HDD 7200rpm
- /dev/sdd – Regular 2TB SATA HDD 7200rpm
- /dev/sde – Regular 2TB SATA HDD 7200rpm
- 2x Samsung PM883 Sata 960GB SSD (for comparision)
MDADM Raid10
First, let’s create a Raid 10 array with HDD.
Wipe all disks
wipefs -a /dev/sdb
wipefs -a /dev/sdc
wipefs -a /dev/sdd
wipefs -a /dev/sde
Create Raid 10
apt-get install mdadm
mdadm --create --verbose /dev/md0 --level=10 --raid-devices=4 /dev/sdb /dev/sdc /dev/sdd /dev/sde
cat /proc/mdstat
mdadm --detail --scan >> /etc/mdadm/mdadm.conf
update-initramfs -u
wipefs -a /dev/md0
Wait untill array synchronization is done
cat /proc/mdstatBcache
Setup Bcache device on the NVMe SSD
apt-get install bcache-tools
make-bcache -C /dev/nvme0n1 -B /dev/md0 --block 4k --bucket 2M --writeback
wipefs -a /dev/bcache0
Extra tuning. Adjust UUIDs to your own local values. Disable sequential_cutoff to ensure all data is written to NVMe SSD, adjust writeback speed, etc… For more information see the Bcache documentation.
echo 0 > /sys/fs/bcache/b204a7f9-8515-4ea6-bbba-1d3834e148ca/congested_write_threshold_us
echo 0 > /sys/fs/bcache/b204a7f9-8515-4ea6-bbba-1d3834e148ca/congested_read_threshold_us
echo 0 > /sys/block/bcache0/bcache/sequential_cutoff
echo 10 > /sys/devices/virtual/block/md0/bcache/writeback_delay
echo 1 > /sys/block/bcache0/bcache/writeback_percent # default 10%
echo 8192 > /sys/block/bcache0/queue/read_ahead_kb # default 128
echo 4096 > /sys/devices/virtual/block/md0/bcache/writeback_rate_minimum
Monitor Bcache status
cat /sys/devices/virtual/block/md0/bcache/writeback_rate_debug
LUKS
Setup disk encryption, it is required to avoid conflicts between Bcache and ZFS, encryption here is just a side effect and performance overhead is negligible.
apt-get install cryptsetup
cryptsetup benchmark
Create encryption key
dd if=/dev/urandom of=/root/.zfs.key bs=1024 count=64
Select preffered hash and encrypt the Bcache device
cryptsetup -v -c aes-xts-plain64 -s 256 --hash sha256 --iter-time 2000 --use-urandom luksFormat /dev/bcache0 /root/.zfs.key
Open crypt /dev/mapper/crypt
cryptsetup open --type luks --key-file /root/.zfs.key /dev/bcache0 crypt
Get block ID, save the UUID
$ blkid | grep bcache0
...
/dev/bcache0: UUID="74de7729-b903-4b27-8494-e9600cd112fb" TYPE="crypto_LUKS"
...
Edit /etc/crypttab, enter the UUID
...
crypt UUID=74de7729-b903-4b27-8494-e9600cd112fb /root/.zfs.key luks
...
ZFS
Finally we can setup the ZFS on the crypt device that is backed by bcache device that is backed by both NVMe and Mdadm array backed by HDDs, insane 🙂
apt-get install zfsutils-linux zfs-dkms zfs-zedZFS tuning for my system, may be irrelevant in yours, ARC set to 16GB, edit /etc/modprobe.d/zfs.conf
options zfs zfs_arc_max=17179869184
options zfs zfs_prefetch_disable=0
options zfs zfs_txg_timeout=10
options zfs l2arc_write_max=2147483648
options zfs l2arc_write_boost=2147483648
options zfs l2arc_headroom=0
options zfs l2arc_noprefetch=0
options zfs l2arc_rebuild_enabled=1
Update initramfs
update-initramfs -u -k allCreate Zpool, 8k block, compression on (lz4), atime off.
zpool create -o ashift=13 -O atime=off -O compression=lz4 pool /dev/mapper/crypt
Create dataset for my OSM database (optional)
zfs create pool/osm
zfs set recordsize=32k pool/osm
Results
As I wrote earlier, I have tried this setup because I had a specific challenge while importing OpenStreetMap data. I will write another article about that battle with more elaborative description on what, how and why so long.
Here, I’ll just give some brief summary. My test bench is the OSM tile server which requires the whole planet data to be imported to the PostgreSQL/PostGIS database, which uncompressed grows to around 2TB. Software used to import data is osm2pgsl and all of 80 threads and 128GB RAM available in the system. Due to workload nature biggest bottlenecks were IO performance and available RAM.
Take the below picture with a grain of salt. It’s not real benchmark just a comparision of the import time with OSM2Pgsql on each test setup.
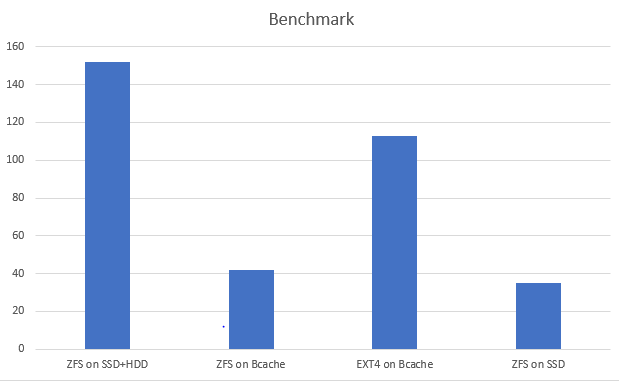
- Test 1: Regular ZFS, 2x hdd + ssd l2arc, zil 16gb, sync=disabled.
Import killed at around 1.11TB running for over 3 days (!)
Value presented on the chart is estimated and ideally should be retried with the same setup as Test2 and Test3.
- Test 2: ZFS on Bcache, 4x hdd raid 10, 500 GB NVMe, compression=lz4, atime=off, sync=standard
Success! Data imported after 42 hours.
Compression ratio 2.65, most hot data fits cache.
- Test 3: EXT4 on Bcache, 4x hdd raid 10, 500 GB NVMe
SLOW! Data imported after 113 hours.
- Test 4: ZFS stripe on dual SATA3 SSD, 2x Samsung 960GB, atime=off, compression=lz4
Success! Data imported after 37 hours.
Summary
As you can see, the performance in my case was slightly lower that the performance of all SSD setup however the SSD pool was overprovisioned and the database could fit only due to compression.
With Bcache also I managed to squeeze most of the database data in the backing NVMe drive but additionally had a lot of extra storage space available due backing to 4x 2TB HDDs which gave around 3.6TB of disk space.
This was a fun proof of concept giving an opportunity to learn more about possible storage setups especially with Bcache and LUKS under Linux.
It seems that production ready setups are possible however would require further testing and duplicating Bcache/Crypt devices to provide basic redundancy.
If you are interested in testing such setup yourself, feel free to share the benchmarks and your conclusions. Hope this post helps you.
Notes
- Don’t use cheap consumer grade NVMe SSD drives for caching, they can’t cope with the throughput and lead to system IO locking.
- LUKS is needed as a middle layer between ZFS and Bcache to avoid overriding of the magic block on the partition/device.
- When building MDADM arrays, WAIT until the process is finished! Otherwise it may lead to Bcache bottlenecking.
- Adjust Bcache options to your own setup.